关键字:C# 操作IE
https://www.cnblogs.com/kissdodog/p/3725774.html
关键字:C# 使用sockes 代理;C# 使用socks5 代理
相关链接:https://www.cnblogs.com/mayblog/p/11007595.html
相关技术
C#实现Socket代理方式的邮件发送
C#实现HTTP代理服务器技术
关键字:C# DllImport
DllImport是 System.Runtime.InteropServices 命名空间下的一个属性类,其功能是提供从 非托管DLL (托管/非托管是微软的.net framework中特有的概念,其中,非托管代码也叫本地(native)代码。
与Java中的机制类似,也是先将源代码编译成中间代码(MSIL,Microsoft Intermediate Language),然后再由.net中的CLR将中间代码编译成机器代码。)导出的函数的必要调用信息.
相关连接:https://blog.csdn.net/aidem_brown/article/details/79820160
DllImport属性应用于方法,要求最少要提供包含入口点的dll的名称
在读写INI配置文件文章中,使用了此方法
Windows 10 Pro在之前早就有一些特殊的版號,像是Windows 10 N、Windows 10 KN,你可能就沒聽過了。不過,沒聽過也是正常的,因為這是微軟針對特殊地區所推出的特別版本。
Windows 10 Pro「N」,是微軟針對歐洲地區的特殊版號,而 Windows 10 Pro 「KN」則是針對韓國的特殊版號。而這兩者與標準 Windows 10 的差別在於,基本上他們都擁有標準的Windows 10內在,只是他們不包括Windows Media Player 以及其它的多媒體播放功能。
時間回到2004年,歐盟委員會認為微軟違反反托拉斯法,Windows自帶多媒體播放器的寡佔優勢,損害了影音播放應用程式廠商的利益,歐盟對微軟開罰5億歐元並且要求微軟推出一個沒有Windows Media Player的Windows,讓消費者以及製造商可以選擇採用這個版本的Windows,然後自己去購買自己喜歡的多媒體程式。歐盟在意的是給消費者一個選擇的權利,因此,在歐洲不是僅有Windows 「N」可以選擇,消費者還是有一般版本的Windows可以購買。
而同樣的問題,到了2005年在韓國重新上演一次,韓國開罰了微軟3千2百萬美元,要求微軟提供一個沒有Windows Media Player 以及 MSN Messenger版本的Windows,有了前車之鑒,這次微軟從善如流,推出了Windows 「KN」版本,提供南韓的消費者選擇的權利。
目前,Windows 10「N」版本不包含有: Windows Media Player, Groove Music, Movies & TV, Voice Recorder, Skype.
而Windows 10「KN」版本,除了不包含上述的內容之外,當初在Windows 7時代原本還多移除了一個Windows Messenger,不過因為微軟已經自己將Windows Messenger從所有版本中拿掉了,因此現在Windows 10「KN」版本與Windows 10「N」版本兩者除了語言的不同之外,移除的內容是一致的
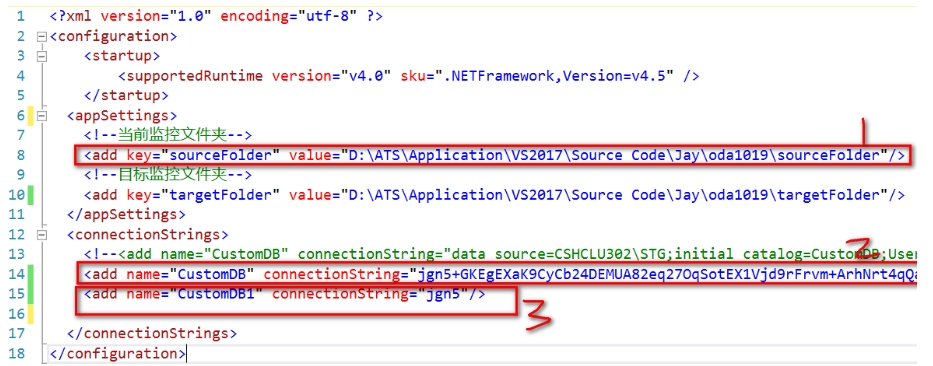
读取操作
由于1处是有 key 的,所以读取的时候只需要:
string sourceFolder = ConfigurationManager.AppSettings["sourceFolder"];而 2 处(数据库连接字符串)没有key,所以读取的时候:
string CustomDB = ConfigurationManager.ConnectionStrings["CustomDB"].ConnectionString;当然,如果你需要多个连接字符串,可以像3处一样,增加即可
写入操作
//写入<add>元素的Value
    config.AppSettings.Settings["name"].Value = "fx163";

    //增加<add>元素
    config.AppSettings.Settings.Add("url", "https://www.guxiaonan.com");

    //删除<add>元素
    config.AppSettings.Settings.Remove("name");

    //一定要记得保存,写不带参数的config.Save()也可以
    config.Save(ConfigurationSaveMode.Modified);

    //刷新,否则程序读取的还是之前的值(可能已装入内存)
System.Configuration.ConfigurationManager.RefreshSection("appSettings");How to convert NameValueCollection to a (Query) String
/// <summary>
/// Constructs a QueryString (string).
/// Consider this method to be the opposite of "System.Web.HttpUtility.ParseQueryString"
/// </summary>
public static string ConstructQueryString(NameValueCollection parameters)
{
	List<string> items = new List<string>();

	foreach (string name in parameters)
		items.Add(string.Concat(name, "=", System.Web.HttpUtility.UrlEncode(parameters[name])));

	return string.Join("&", items.ToArray());
}
https://leekelleher.com/2008/06/06/how-to-convert-namevaluecollection-to-a-query-string/
转为Json
Headers = JsonConvert.SerializeObject(Request.Headers)
快速
string.Join(",",Request.Headers.AllKeys.SelectMany(Request.Headers.GetValues, (k, v) =>new { key = k, value = v }));

var headersString = string.Join(
    Environment.NewLine,
    Request.Headers.AllKeys.SelectMany(
        Request.Headers.GetValues,
        (k, v) => k + ": " + v));
快速按行输出
string headersString = string.Join("\r\n", context.Request.Headers.Select(s =>s.Key + ":" + s.Value.ToString()));使用换行符号作为连接
关键字:ini文件格式
如何读写:
https://www.cnblogs.com/ashbur/p/12020507.html
ini配置文件格式
https://blog.csdn.net/a123441/article/details/90668032
首先文件扩展名
配置文件.ini
格式
ini配置文件由节、键、值组成
【参数】(键=值):
INI所包含的最基本的“元素”就是参数(parameter),每个参数都有一个name和一个value,name和value由等号“=”隔开,name在等号的左边。如:
name=value
节
所有的参数都是以节(section)为单位结合在一起的。
所有的section名称都是独占一行,并且section名字都被方括号包围着([和])。在section声明后的所有parameters都属于该section。
一个section没有明显的结束标识符,
一个section的开始就是上一个section的结束,或者是文件结束
[section]
最好用的ini配置文件辅助类
public class IniFileHelper
{
    #region API函数声明

    [DllImport("kernel32")]//返回0表示失败,非0为成功
    private static extern long WritePrivateProfileString(string section,string key,
        string val,string filePath);

    [DllImport("kernel32")]//返回取得字符串缓冲区的长度
    private static extern long GetPrivateProfileString(string section,string key,
        string def,StringBuilder retVal,int size,string filePath);


    #endregion

    #region 读Ini文件

    public static string ReadIniData(string Section,string Key,string NoText,string iniFilePath)
    {
        if(File.Exists(iniFilePath))
        {
            StringBuilder temp = new StringBuilder(1024);
            GetPrivateProfileString(Section,Key,NoText,temp,1024,iniFilePath);
            return temp.ToString();
        }
        else
        {
            return String.Empty;
        }
    }

    #endregion

    #region 写Ini文件

    public static bool WriteIniData(string Section,string Key,string Value,string iniFilePath)
    {
        if(!File.Exists(iniFilePath))
        {
            using(FileStream fs=new FileStream(iniFilePath,FileMode.Create,FileAccess.Write))
            {
                fs.Close();
            }
        }
        if(File.Exists(iniFilePath))
        {
            long OpStation = WritePrivateProfileString(Section,Key,Value,iniFilePath);
            if(OpStation == 0)
            {
                return false;
            }
            else
            {
                return true;
            }
        }
        else
        {

            return false;
        }
    }

    #endregion
}
读取节点信息:
IniFileHelper.ReadIniData("config", "lastPath", "", System.IO.Path.Combine(AppDomain.CurrentDomain.BaseDirectory, "lahuseo.ini"));程序自动到当前执行程序的根目录找文件名为”lanhuseo.ini“的文件,节点组为config,节点key为lastpath的值
更新节点信息:
IniFileHelper.WriteIniData("config", "lastPath"
                , txtLogDirOrFile.Text.Trim()
                , System.IO.Path.Combine(AppDomain.CurrentDomain.BaseDirectory, "lahuseo.ini"));
这样存的文件内容为:
[config]
lastPath=C:\Users\Administrator\Desktop\新建文件夹\W3SVC12
这里用到用到了DllImport直接用了windows系统内核的kernel32.dll的现成的两个方法,WritePrivateProfileString和GetPrivateProfileString。
如果在写文件没有指定的文件会自动创建一个相应的ini文件,在读的时候没有文件直接返回空,当然这里你可以根据你的需要修改

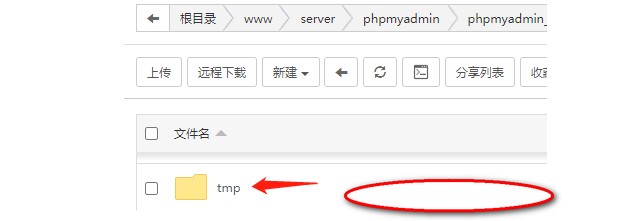
这个是文件夹权限的问题,找到phpmyadmin的安装目录下的tmp文件夹,权限设为777,刷新phpmyadmin,提示消失了
相关链接
https://zhan.leiue.com/wordpress-rename-images.html
https://zmingcx.com/wordpress-upload-file-renaming.html
关键字:wordpress 上传图片重命名
使用方法
将代码添加到当前主题functions.php模板文件中即可
代码一,按时间重命名
上传文件时会以“年月日时分秒+千位毫秒整数”的格式重命名文件,如“20161023122221765.jpg”
//上传文件重命名
function git_upload_filter($file) {
    $time = date("YmdHis");
    $file['name'] = $time . "" . mt_rand(1, 100) . "." . pathinfo($file['name'], PATHINFO_EXTENSION);
    return $file;
}
add_filter('wp_handle_upload_prefilter', 'git_upload_filter');
代码二,用MD5加密生成数字并重命名
名称规则是由系统自动生成的一个32位的MD5加密文件名,由于默认生成的32位文件名有点长,所以使用substr(md5($name), 0, 20) 截断将其设置为20位
function rename_filename($filename) {
    $info = pathinfo($filename);
    $ext = emptyempty($info['extension']) ? '' : '.' . $info['extension'];
    $name = basename($filename, $ext);
    return substr(md5($name), 0, 20) . $ext;
}
add_filter('sanitize_file_name', 'rename_filename', 10);
其他代码
//根据上传时间重命名文件
add_filter('wp_handle_upload_prefilter', 'custom_upload_filter' );
function custom_upload_filter( $file ){
	$info = pathinfo($file['name']);
	$ext = $info['extension'];
	$filedate = date('YmdHis').rand(10,99);//为了避免时间重复,再加一段2位的随机数
	$file['name'] = $filedate.'.'.$ext;
    return $file;
}
//使用md5转码文件名
add_filter('wp_handle_upload_prefilter', 'custom_upload_filter' );
function custom_upload_filter( $file ){
$info = pathinfo($file['name']);
$ext = '.' . $info['extension'];
$md5 = md5($file['name']);
$file['name'] = $md5.$ext;
return $file;
}